
Home : Workshop :
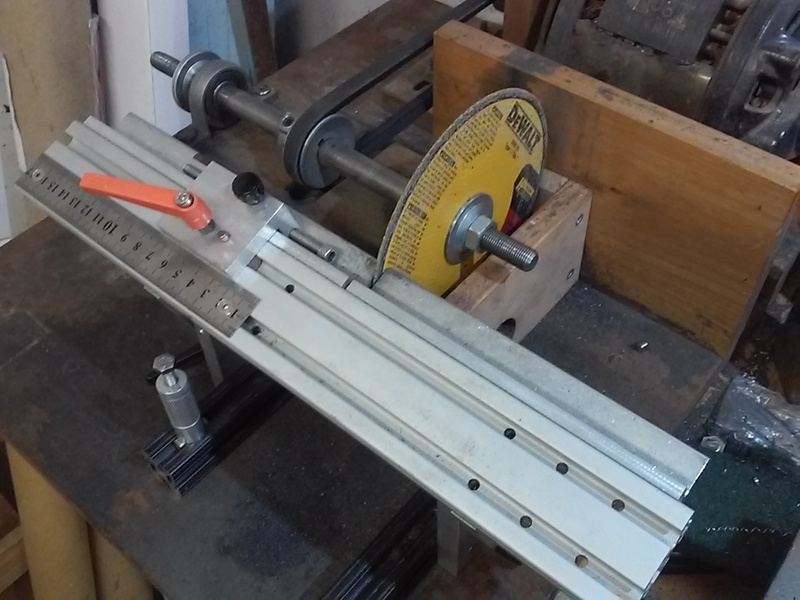
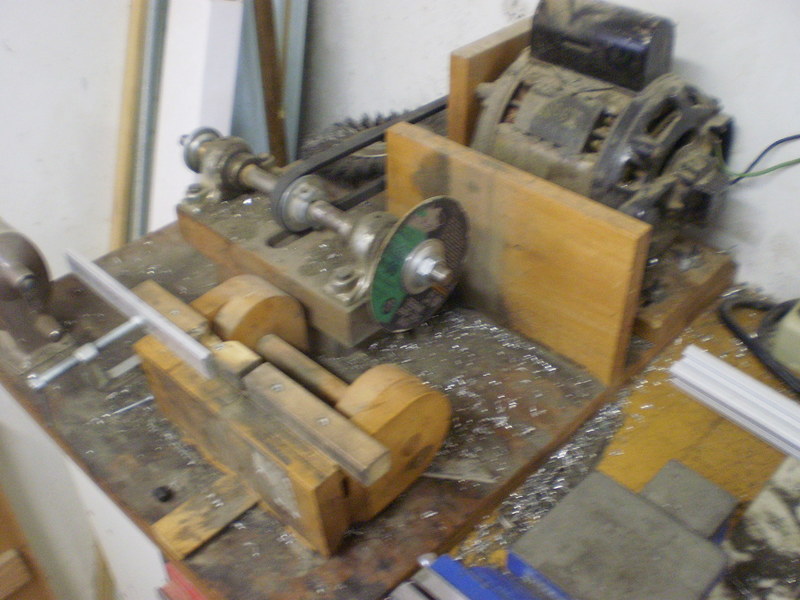
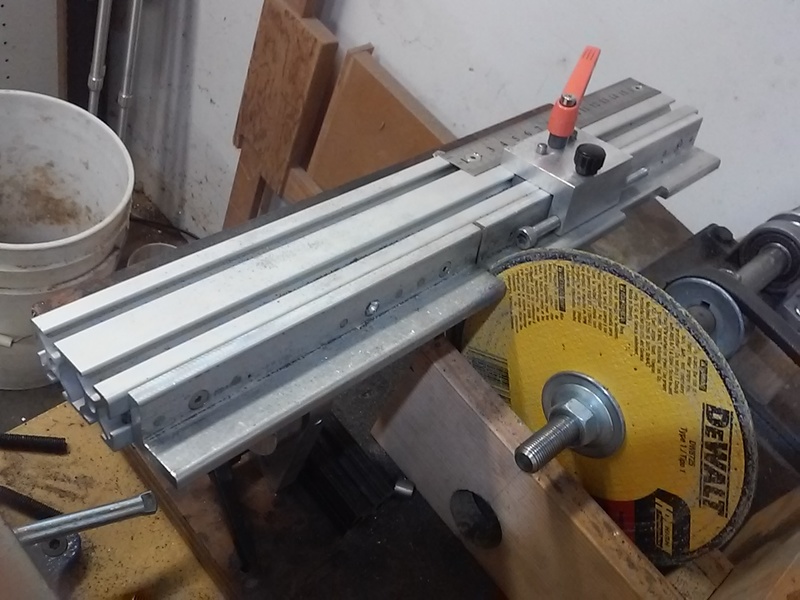
 I had been cutting metal using an old fixture that I originally made for sharpening woodworking blades. The idea of a fixture that pivots to set the grinding angle also worked for pivoting a piece of stock through an abrasive blade. The low rpm (1750) motor also worked well in both applications..
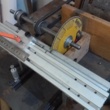
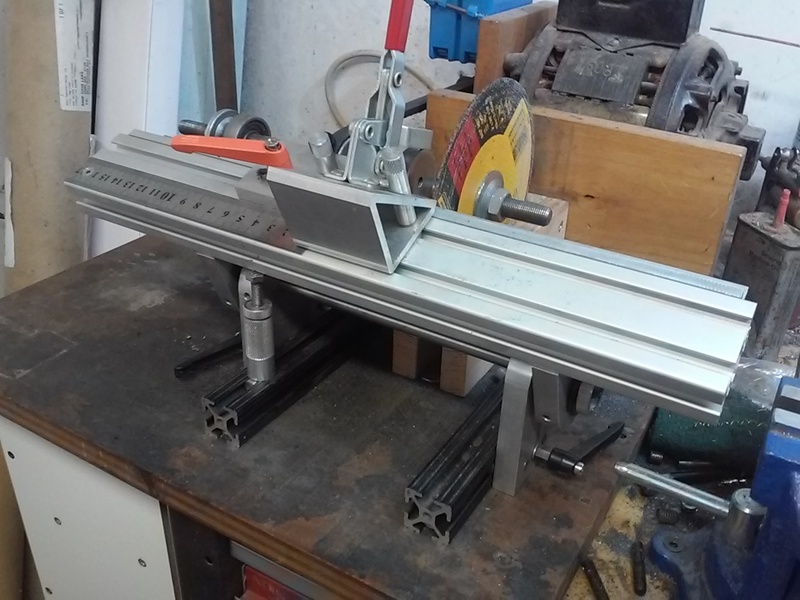
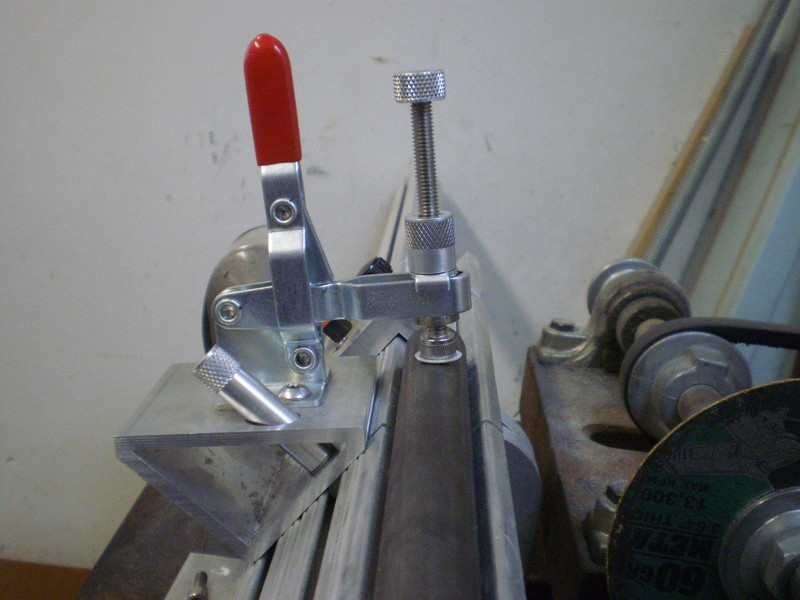
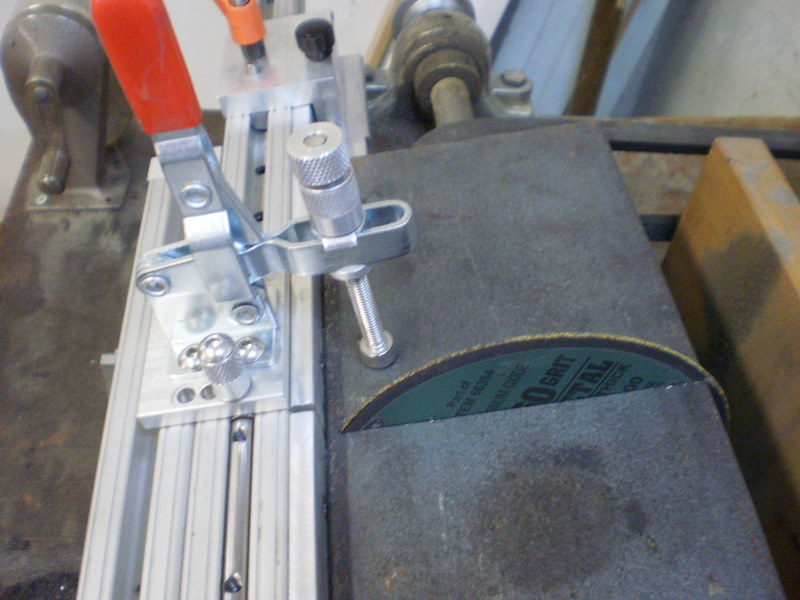
I took the basic design of the wood fixture and beefed it up. The top piece is 1020 extrusion and serves as a fence. Pieces of 1 x 1/4" angle are mounted to the front of the extrusion to support the stock being cut. The stop and toggle clamp slide in a t-slot and can be set to cut material as short as ~3/8". Different toggle clamp bases allow cutting flat or round stock. I've cut rounds as big as 1-3/8" and flat stock as wide as 4".
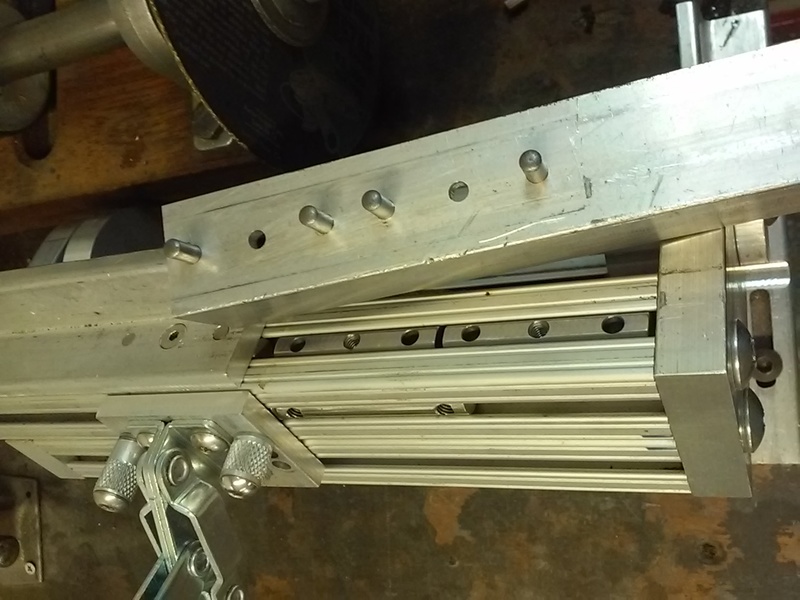
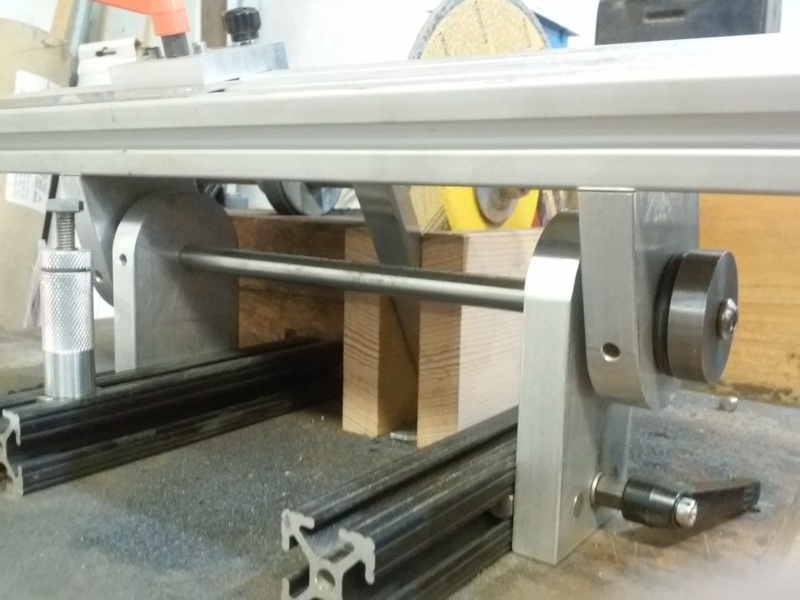
The mounting tracks are two pieces of 1010 extrusion and the supports/pivots are 2 x 1/2" aluminum radiused on one end. The connecting rod is 10mm drill rod. The top/outside pivot pieces have 10 x 15mm bearings on the inside and 10 x 24 x 4 needle thrust bearings on both sides. The bearings are protected with 32 x 4mm o-rings. The bottom/inside supports have setscrews to lock them to the 10mm rod and locating pins that mate with self-squaring t-slot nuts in the mounting tracks.
See also: 1 minute YouTube video and T-slot Toggle Clamp Bases.
[ comment | link | top ]
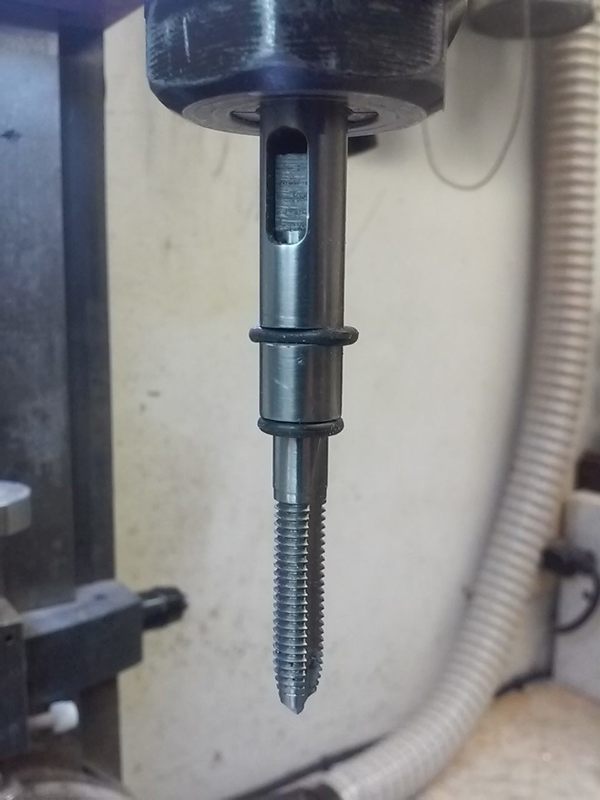
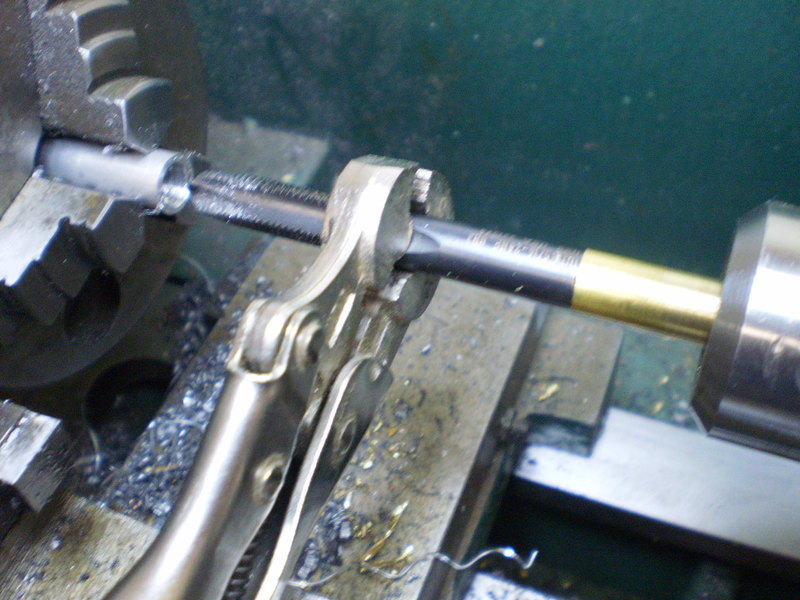
 I now do all my power tapping using tapping sleeves. Unlike tapping collets, taps inside a tapping sleeve can float lengthwise. The float provides a small buffer that allows the tap to feed itself freely, unaffected by variations in feed rate (e.g. non-floating quills). When tapping on the lathe, these sleeves are particularly handy because the float - the movement of the tap inside the the sleeve - is visible. For vertical tapping I've found o-rings to be usefull for holding the tap in the sleeve and for keeping track of the tap's location relative to the sleeve.
It's been a long time since I've done vise-grip tapping (precursor to tapping sleeves). While spiral flute tapping is pretty cool (and best for blind/bottom tapping), two flute spiral point taps are my preference because they seem to last longer and require less torque... I also like thread forming/roll taps which seem to work well in everything but hardened steel.
...tapping an m6 x 35mm through hole with a tapping sleeve (24sec YouTube video).
[ comment | link | top ]
 I'd been thinking a micrometer would probably be better than a caliper for lathe work. I had mixed feelings about getting an electronic one - it would be easier to read, but the cheap ones only work with batteries (no manual scale). My eBay timing was right and I got a new cheap electronic caliper really cheap (hopefully the larger battery lasts a longer than my caliper batteries do... not much, should have bought a digit counter micrometer... first, because that's all I use now).
The ABS function alone make electronic micrometers indispensable. Sizing material is so much easier when you can set the micrometer to the size you want (e.g. n.025mm or n.001" for a press fit) and read how much material needs to be removed. Other noticeable micrometer (VS caliper) benefits (probably Machining 101) are that the larger contact points make it easier to get a good feel for the faces being inline with the stock (more accurate) and the reading doesn't change when carefully sliding the micrometer off the stock.
The stand makes it easy to pick up the micrometer by the body/sleeve or frame. Its made from four 1/2" Corian blocks screwed to a 1/4" Corian base. The base was sized to fit one of my divided drawer compartments.
[ comment | link | top ]
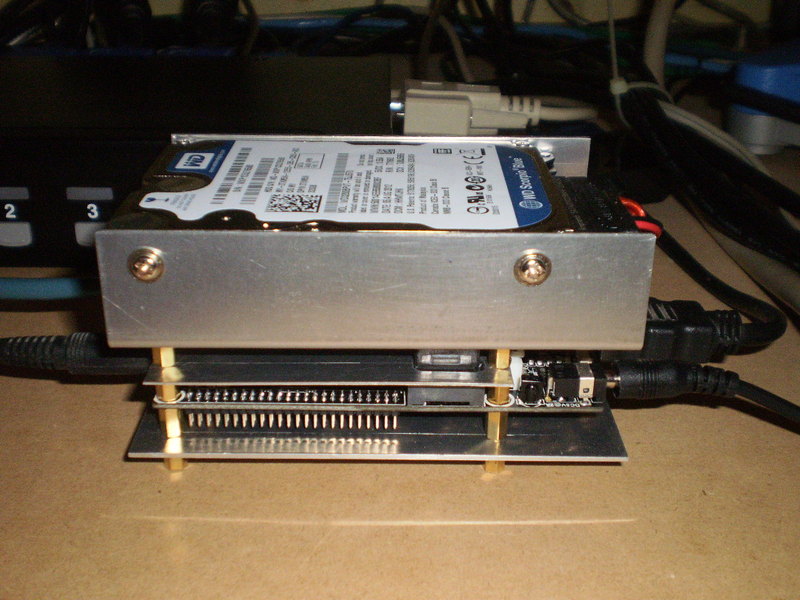
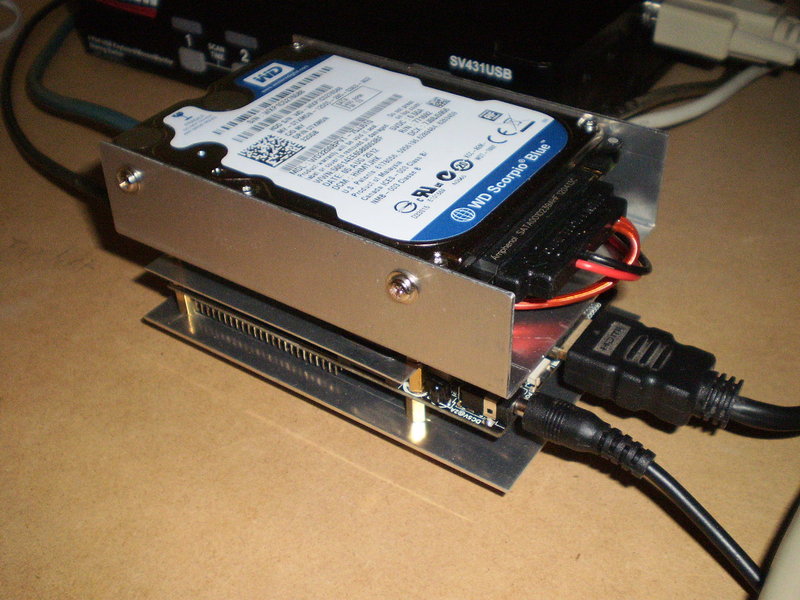
 This case started out real simple, two pieces of 1.2mm aluminum and a bunch of 8mm tall m3 standoffs. Adding a SATA drive was awkward because of the location of the SATA connector. The only reasonably aesthetic option seemed to be stacking the drive on top of the board. Mounting the drive at the top of a bent channel provides space for the protruding SATA connector, wires and air circulation. I also added a .5mm strip of aluminum, above the processor, to further buffer the processor from the drive. This also saved machining the bottom of the channel to keep pressure off the USB socket (2-8mm standoffs are a tad short).
[ comment | link | top ]
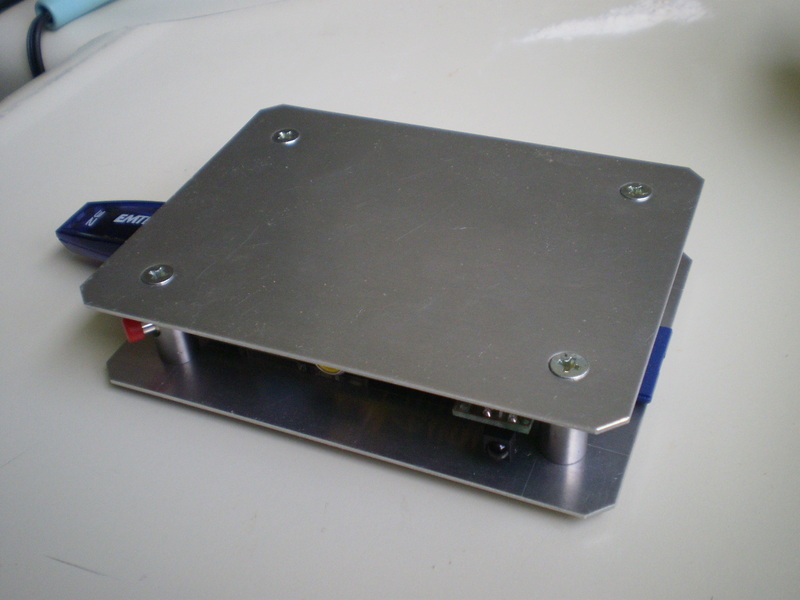
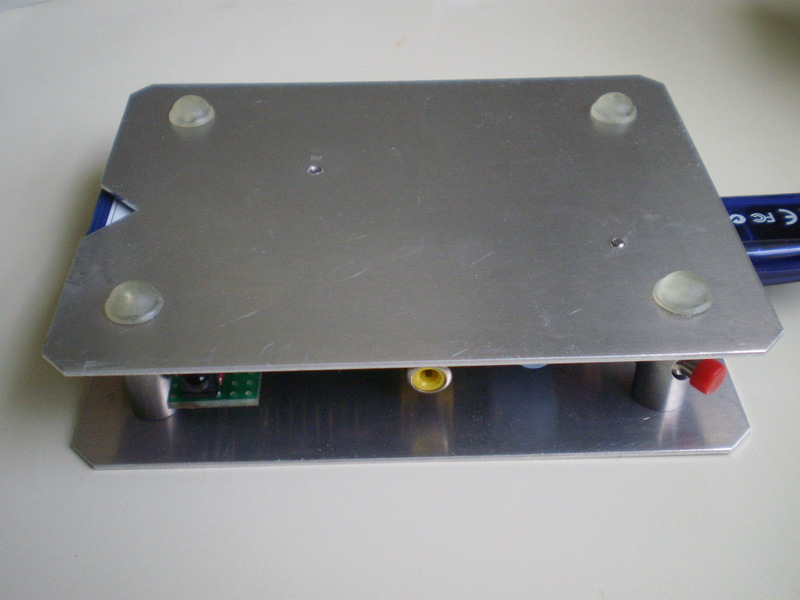
 A simple case for the Rasperry Pi using sheet aluminum and drill rod. The drill rod posts are notched (see back right post) to hold the corners of the board (they warn about relying on the two mounting holes in the board). The posts are also countersunk, and the aluminum dimpled, so that the flat head machine screws are flush to the aluminum. The bottom is notched for easy removal of the SD card. One post was drilled to accommodate a reset switch (which will also boot the Pi if the wall wart is left plugged in). Unrelated to metalworking was the addition of an IR receiver (there's a dimpled screw hole in the background) for a remote control.
[ comment | link | top ]
Metalwork
Abrasive Cut-off Fixture
 I had been cutting metal using an old fixture that I originally made for sharpening woodworking blades. The idea of a fixture that pivots to set the grinding angle also worked for pivoting a piece of stock through an abrasive blade. The low rpm (1750) motor also worked well in both applications..
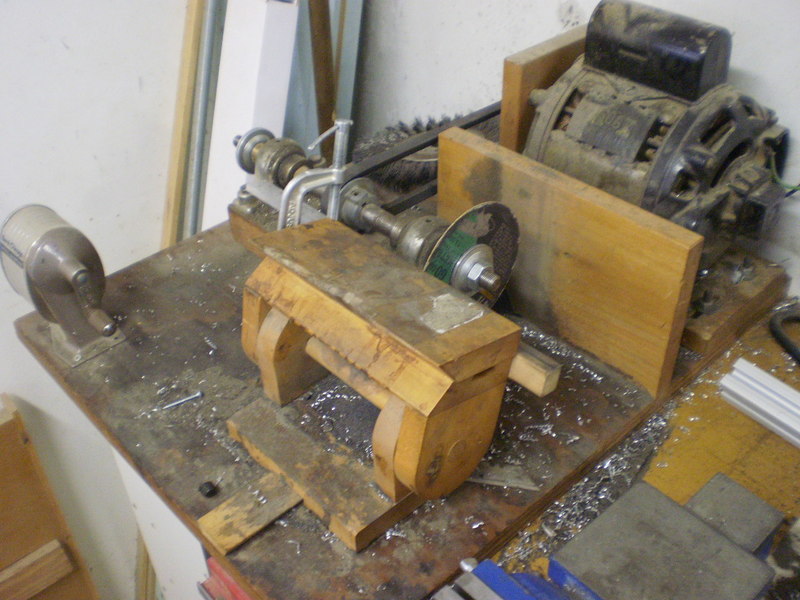
I took the basic design of the wood fixture and beefed it up. The top piece is 1020 extrusion and serves as a fence. Pieces of 1 x 1/4" angle are mounted to the front of the extrusion to support the stock being cut. The stop and toggle clamp slide in a t-slot and can be set to cut material as short as ~3/8". Different toggle clamp bases allow cutting flat or round stock. I've cut rounds as big as 1-3/8" and flat stock as wide as 4".
The mounting tracks are two pieces of 1010 extrusion and the supports/pivots are 2 x 1/2" aluminum radiused on one end. The connecting rod is 10mm drill rod. The top/outside pivot pieces have 10 x 15mm bearings on the inside and 10 x 24 x 4 needle thrust bearings on both sides. The bearings are protected with 32 x 4mm o-rings. The bottom/inside supports have setscrews to lock them to the 10mm rod and locating pins that mate with self-squaring t-slot nuts in the mounting tracks.
See also: 1 minute YouTube video and T-slot Toggle Clamp Bases.
[ comment | link | top ]
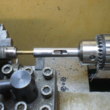
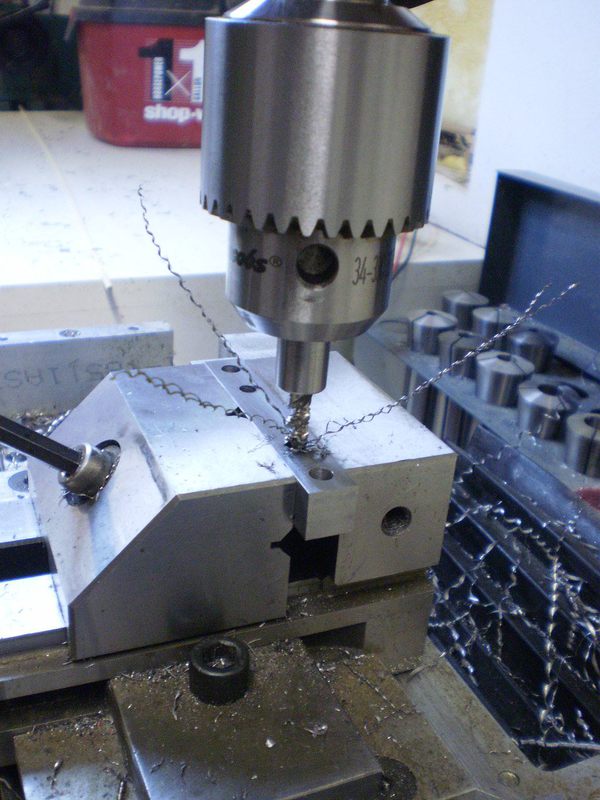
Tapping Sleeves
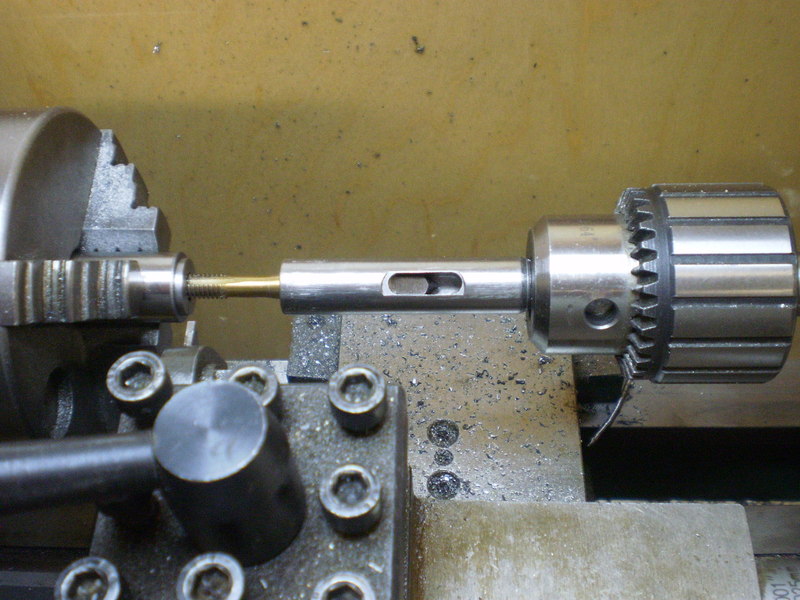 I now do all my power tapping using tapping sleeves. Unlike tapping collets, taps inside a tapping sleeve can float lengthwise. The float provides a small buffer that allows the tap to feed itself freely, unaffected by variations in feed rate (e.g. non-floating quills). When tapping on the lathe, these sleeves are particularly handy because the float - the movement of the tap inside the the sleeve - is visible. For vertical tapping I've found o-rings to be usefull for holding the tap in the sleeve and for keeping track of the tap's location relative to the sleeve.
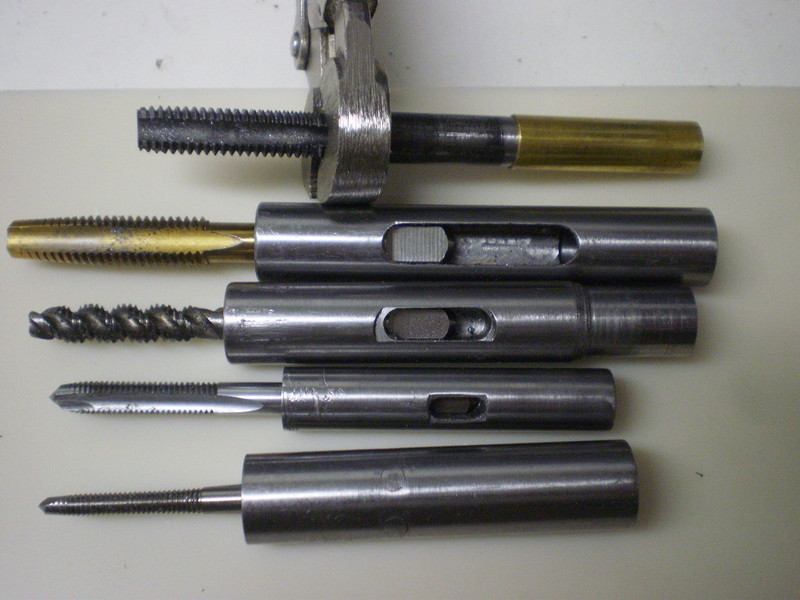
It's been a long time since I've done vise-grip tapping (precursor to tapping sleeves). While spiral flute tapping is pretty cool (and best for blind/bottom tapping), two flute spiral point taps are my preference because they seem to last longer and require less torque... I also like thread forming/roll taps which seem to work well in everything but hardened steel.
...tapping an m6 x 35mm through hole with a tapping sleeve (24sec YouTube video).
[ comment | link | top ]
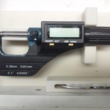
Electronic Micrometer
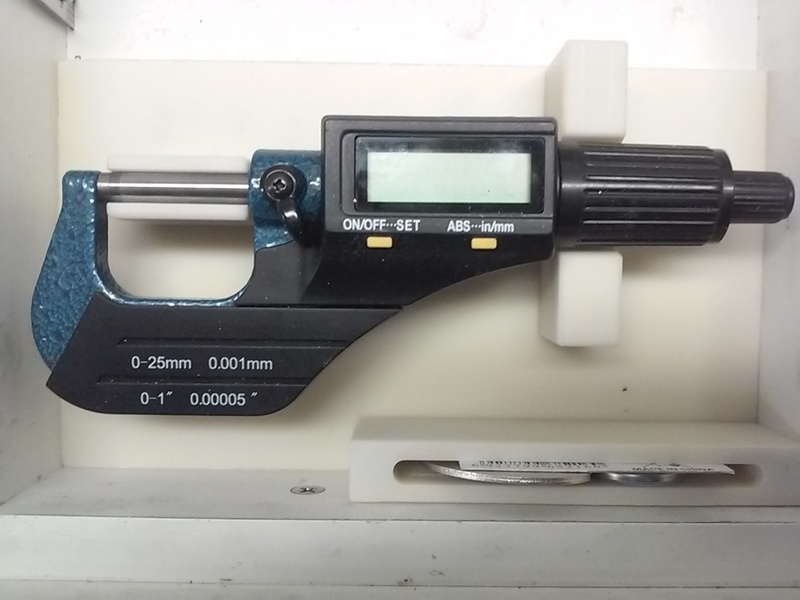 I'd been thinking a micrometer would probably be better than a caliper for lathe work. I had mixed feelings about getting an electronic one - it would be easier to read, but the cheap ones only work with batteries (no manual scale). My eBay timing was right and I got a new cheap electronic caliper really cheap (hopefully the larger battery lasts a longer than my caliper batteries do... not much, should have bought a digit counter micrometer... first, because that's all I use now).
 The ABS function alone make electronic micrometers indispensable. Sizing material is so much easier when you can set the micrometer to the size you want (e.g. n.025mm or n.001" for a press fit) and read how much material needs to be removed. Other noticeable micrometer (VS caliper) benefits (probably Machining 101) are that the larger contact points make it easier to get a good feel for the faces being inline with the stock (more accurate) and the reading doesn't change when carefully sliding the micrometer off the stock.
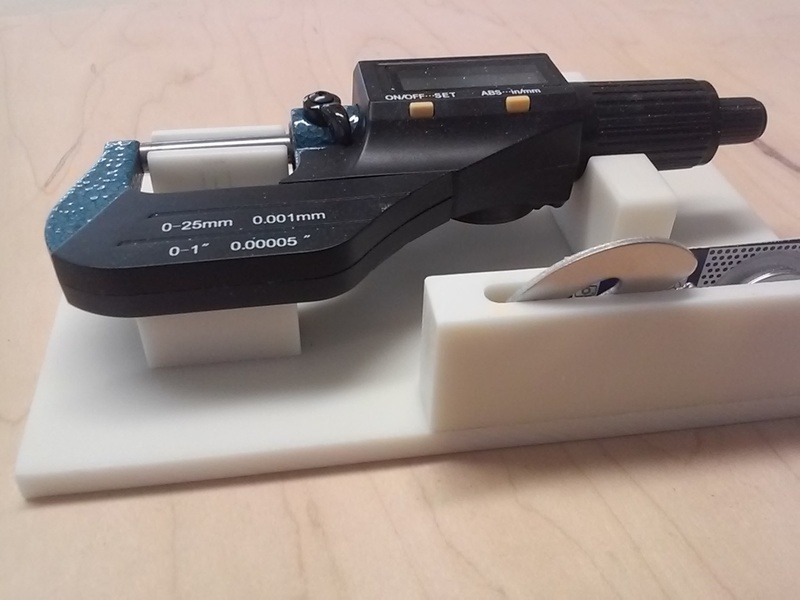
The stand makes it easy to pick up the micrometer by the body/sleeve or frame. Its made from four 1/2" Corian blocks screwed to a 1/4" Corian base. The base was sized to fit one of my divided drawer compartments.
[ comment | link | top ]
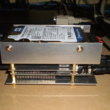
Cubieboard Case
 This case started out real simple, two pieces of 1.2mm aluminum and a bunch of 8mm tall m3 standoffs. Adding a SATA drive was awkward because of the location of the SATA connector. The only reasonably aesthetic option seemed to be stacking the drive on top of the board. Mounting the drive at the top of a bent channel provides space for the protruding SATA connector, wires and air circulation. I also added a .5mm strip of aluminum, above the processor, to further buffer the processor from the drive. This also saved machining the bottom of the channel to keep pressure off the USB socket (2-8mm standoffs are a tad short).
[ comment | link | top ]
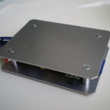
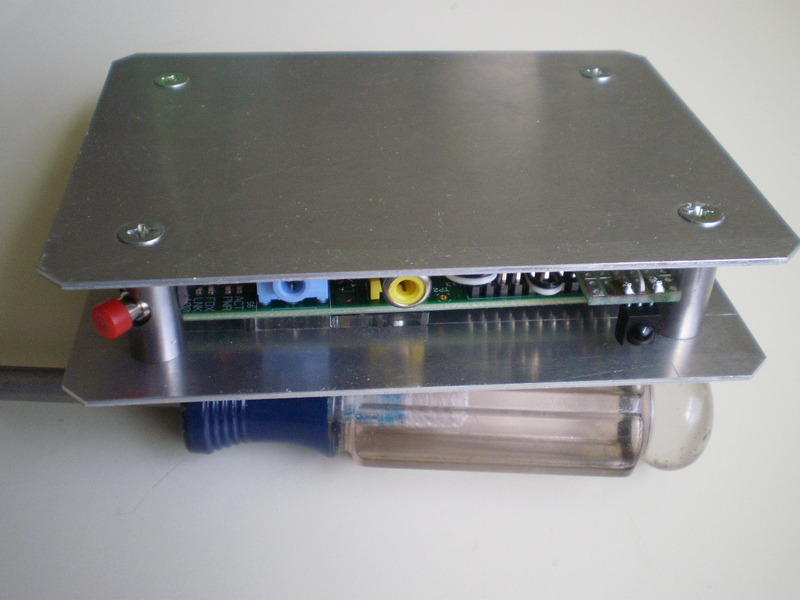
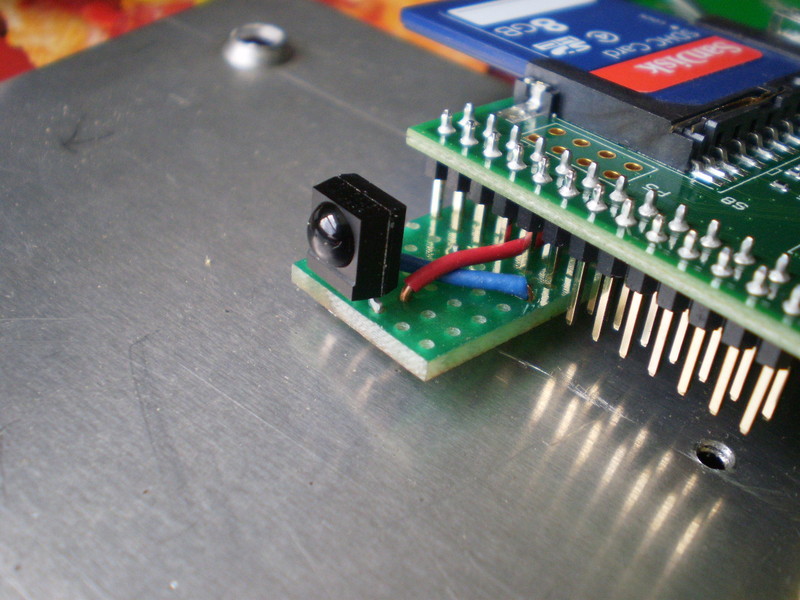
Raspberry Pi Case
 A simple case for the Rasperry Pi using sheet aluminum and drill rod. The drill rod posts are notched (see back right post) to hold the corners of the board (they warn about relying on the two mounting holes in the board). The posts are also countersunk, and the aluminum dimpled, so that the flat head machine screws are flush to the aluminum. The bottom is notched for easy removal of the SD card. One post was drilled to accommodate a reset switch (which will also boot the Pi if the wall wart is left plugged in). Unrelated to metalworking was the addition of an IR receiver (there's a dimpled screw hole in the background) for a remote control.
[ comment | link | top ]