
Hot Air Edge Banding
Modifications
 The first and most obvious is table size. Putting the bander under an 8' top makes banding 8' and even 10' stock an easy task. The workbench fences are related to the boring machine workbench (next to the bander) and are not necessary for the bander. You may have noticed the left bander fence is not in place. I removed it to band some corbels and never put it back (it also is not necessary). If I did it again I would make sure the back counter was thinner than the front by at least 1/8" to allow for the tape overhang when banding irregular shapes (like corbels).
I have made some modifications to the machine which I am going to preface with the disclaimerthat these are potentially dangerous, don't do any modifications unless you know what you are doing and accept all responsibility for the results. Things I have done include:
- Bypassing the temperature knob so the temp is always at max.
- Truing the silicone roller for much nicer results. I cannot remember how I did this. I did it in place probably using a hole saw in a drill to spin it and sticky back sandpaper on something like a 3 x 3 x 12 squared piece of wood.
- Reshaped the air nozzle and fastened it up tight against the guide to focus more heat on 3/4 banding.
- Turned the left guide clockwise so when the roll gets small its easier for the tape to go from guide to guide (the curling tendency tries to prevent this)
- Moved the left guide assembly forward to try and keep the melted glue from dragging on the guide. I did it mainly to help the heavy wood banding (stiff) but melamine/poly is better for it as well. I moved it forward about 1/4" and don't think much more is possible. The angle of the assembly is clockwise of the factory set position. You will have to play with the angles of both assembly to get the best feed in the most situations.
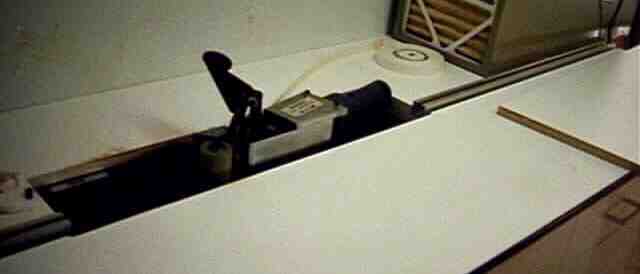
There is a close up picture that should help in visualizing the above modifications. I have not seen the other makes but they look very similar to my Freud. Again I should note that most of my modifications are increasing heat to the banding and while I have never seen flames the potential exists. The whole idea is to be able to run stuff trough at a reasonable pace and I have had banding bubble and turn brown when it sat in one place to long.
![]()
Polyester and Melamine
Veneer
For real wood banding I recommend only the heavyweight banding. Unfortunately I don't think it is very widely available. It is called something like 'back and sanded' and is made by Woodtape (if someone asks I'll get the details). It is not a 'premium grade' in that it has splices and is not sanded very smooth on the face. The advantages are that it tracks well in the bander and you can use a 1/16" radius on it. As with melamine/polyester banding the trimmers I have tried have not worked very well. The utility knife does not work very well here either as it will try to follow the grain no matter how you try. I took a refresher course recently to remind myself that it doesn't work. I use a 1/16" roundover bit in an offset base laminate router and take two passes. The first pass is done with the router base sitting on the edge banding and removes most of the excess banding. At this point you have a few options but I usually trim off the little flap of backing that remains carefully using the utility knife and then take another pass with the router on the face of the stock being banded. I try to save my sanding until last but you could clean up whatever the first pass of your router left with a quick sanding then take your second pass. You could also use a straight bit for the first cut but will need to careful that you don't rock and overcut. It should be noted that this isn't the neatest way to trim banding but I have found nothing more consistent and problem free, the nice consistent eased edge is an added bonus.
PVC
>Unfortunately the small shop cannot edge band PVC without a glue pot
>bander as PVC will melt with an iron or hot air bander. The later
>*might* be possible but I was never able to chase down the one
>manufacturer that was (I think past tense) making pre glued PVC.
Well it turns out that just about the time I gave up Woodtape was starting to make preglued PVC. I have done some experimenting and it will kind of work with the heat gun type table banders. I do not get the same quality of bond as with a gluepot bander and in my opinion it is just not good enough. It also does melt quite easily and needs to be just on the edge of melting to get any resemblance of a decent bond. There are other types of hot air banders that might work better. One that you can get a video of is the Rak Omer (approx $2,000 from Laguna Tools) which has a powered roller that will make the feed rate consistent (important with PVC). The hot air nozzle location,focusing and use of compressed air may make it more effective. I think with the heat gun type there is to much hot air going all over which heats the PVC to melting point before the glue really melts. Since the nozzle on the Rak Omer comes after the tape guides it would seem that less heat will make its way to the backside thus being more effective in heating just the hot melt. It may also heat the board a bit which would aid in getting a good bond. I think I would prefer a used manual gluepot bander over this alternative (see Exfactory for some possibilities). You might also be interested in the note I got with my sample roll.
Comments [ new ]
- CNC Edge Banding Machine
- Posted by Leon Black on Friday, 15-Nov-2019
Edgebanding machine contains the processes of: pre-milling, spray anti-glue coating agent, preheating of the plate, pressure sealing and cutting, front and rear cutting and roughing up and down, scratch repair and polishing.
[ reply | link ] to this. Go to [ topic | top ]
For fast and large quantity of edgebanding work, an CNC edgebander is a good choice.